






Profile Perfect Level 195 Hinweise & Lösung
„Die Wüstenartefakt-Jagd“ – eine Leiter mit vier Ebenen: eine Lösung auf einen Klick, Hinweise, die schrittweise stärker werden, die erklärte Logik und die vollständige Lösung. Nimm nur die Ebene, die du brauchst.
Lösung
Nur wegen der Lösung hier? Öffne das Panel unten und kopiere das Gitter ins Spiel – nichts anderes wird verraten.
SpoilerLösungsgitter anzeigen
| Person | Personen | Personen | Mission | Guiding Tool | Zustand | Ort |
|---|---|---|---|---|---|---|
| Entdecker A | Andrea | Wasser | Radio / Compass | Verängstigt | Pyramide | |
| Entdecker B | Ricky | Camel / Delivery | Stick | Wütend | Nowhere | |
| Entdecker C | Arthur | Artefakt | Kompass | Fainted | Oase | |
| Entdecker D | Marilyn | Ruinen | GPS / Map | Müde | Uluru | |
| Entdecker E | Paul | Exploration | Intuition | Müde | Ruinen |
Tipps
Tipps werden nacheinander freigeschaltet: Öffne Tipp 1, und erst dann erscheint Tipp 2. Höre auf, sobald der Fall klar ist.
Tipp 1 Tippen zum Anzeigen
Start with the explorer whose fear directly reveals their name and their mission.
Tipp 2 Tippen zum Anzeigen
Lock onto the explorer who travels by his own knowledge; the place he is investigating becomes another explorer's mission.
Tipp 3 Tippen zum Anzeigen
Use the stick-and-GPS non-neighbor clue to place the tool cards, then fill the leftover locations and conditions.
Video-Anleitung
Sehen Sie sich die vollständige Lösung an: das Raster, die Hinweiskarten und jede Platzierung in der richtigen Reihenfolge – jeder Schritt unten ist mit dem Moment verknüpft, in dem er im Durchlauf passiert.
-
1 Andrea fears dehydration 0:00 – 0:07
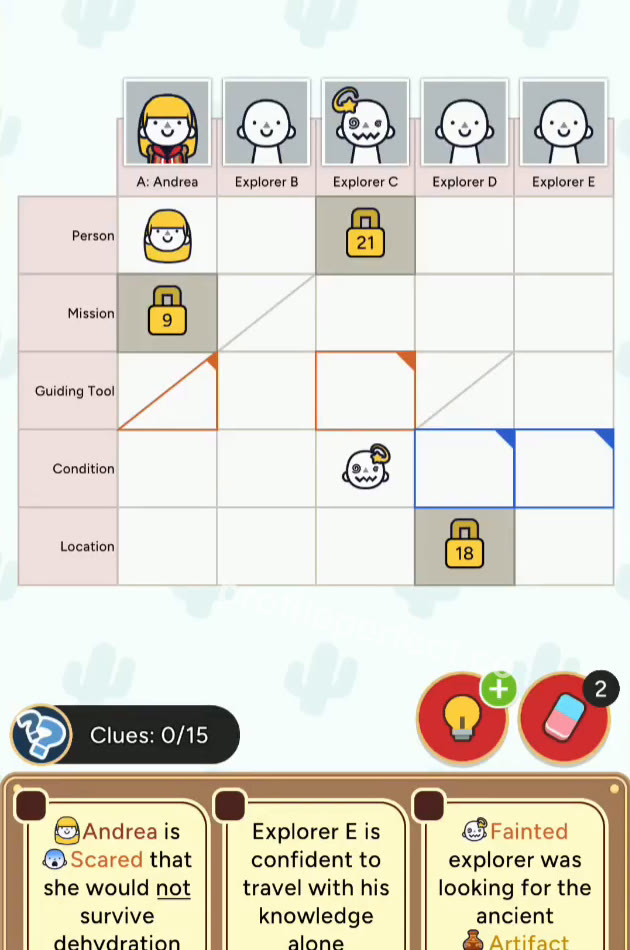
Andrea is scared that she would not survive dehydration, so Explorer A's Person is Andrea, Condition is Scared, and Mission is Water.
Drag the Andrea card to Explorer A's Person cell, the Scared card to Explorer A's Condition cell, and the Water card to Explorer A's Mission cell.
-
2 Fainted explorer looks for Artifact 0:07 – 0:14
The fainted explorer was looking for the ancient Artifact, so Explorer C's Condition is Fainted, Mission is Artifact, and Person is Arthur.
Drag the Fainted card to Explorer C's Condition cell, the Artifact card to Explorer C's Mission cell, and the Arthur card to Explorer C's Person cell.
-
3 E relies on his own knowledge 0:14 – 0:21
Explorer E is confident to travel with his knowledge alone, so Explorer E's Guiding Tool is Intuition, Person is Paul, and Mission is Exploration.
Drag the Intuition card to Explorer E's Guiding Tool cell, the Paul card to Explorer E's Person cell, and the Exploration card to Explorer E's Mission cell.
-
4 Marilyn tracks Paul's Ruins 0:21 – 0:28
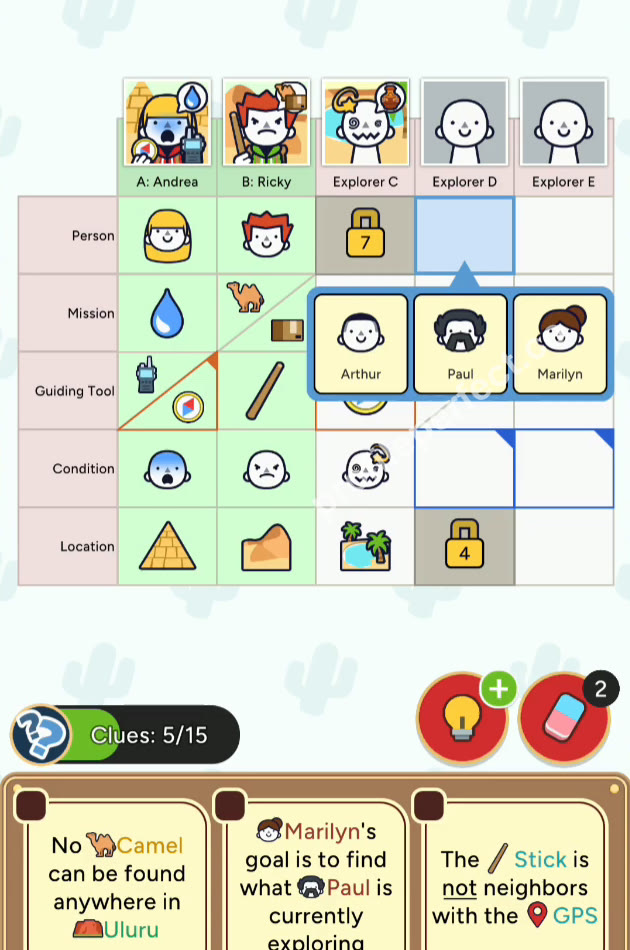
Marilyn's goal is to find what Paul is currently exploring, so Explorer D's Person is Marilyn and Mission is Ruins, while Explorer E's Location is Ruins. Since no Camel can be found anywhere in Uluru, Explorer D's Location is Uluru.
Drag the Marilyn card to Explorer D's Person cell, the Ruins mission card to Explorer D's Mission cell, the Ruins location card to Explorer E's Location cell, and the Uluru card to Explorer D's Location cell.
-
5 Stick is not next to GPS 0:28 – 0:35
The Stick is not neighbors with the GPS, so Explorer B's Guiding Tool is Stick, Explorer D's is GPS / Map, and Explorer A's is Radio / Compass.
Drag the Stick card to Explorer B's Guiding Tool cell, the GPS / Map card to Explorer D's Guiding Tool cell, and the Radio / Compass card to Explorer A's Guiding Tool cell.
-
6 Ricky finishes row B 0:35 – 0:42
Explorer B's Person is Ricky, Mission is Camel / Delivery, Condition is Angry, and Location is Nowhere.
Drag the Ricky card to Explorer B's Person cell, the Camel / Delivery card to Explorer B's Mission cell, the Angry card to Explorer B's Condition cell, and the Nowhere card to Explorer B's Location cell.
-
7 Location and tool cleanup 0:42 – 0:46
Explorer A's Location is Pyramid, Explorer C's Location is Oasis, and Explorer C's Guiding Tool is Compass.
Drag the Pyramid card to Explorer A's Location cell, the Oasis card to Explorer C's Location cell, and the Compass card to Explorer C's Guiding Tool cell.
-
8 Tired condition finish 0:46 – 0:50
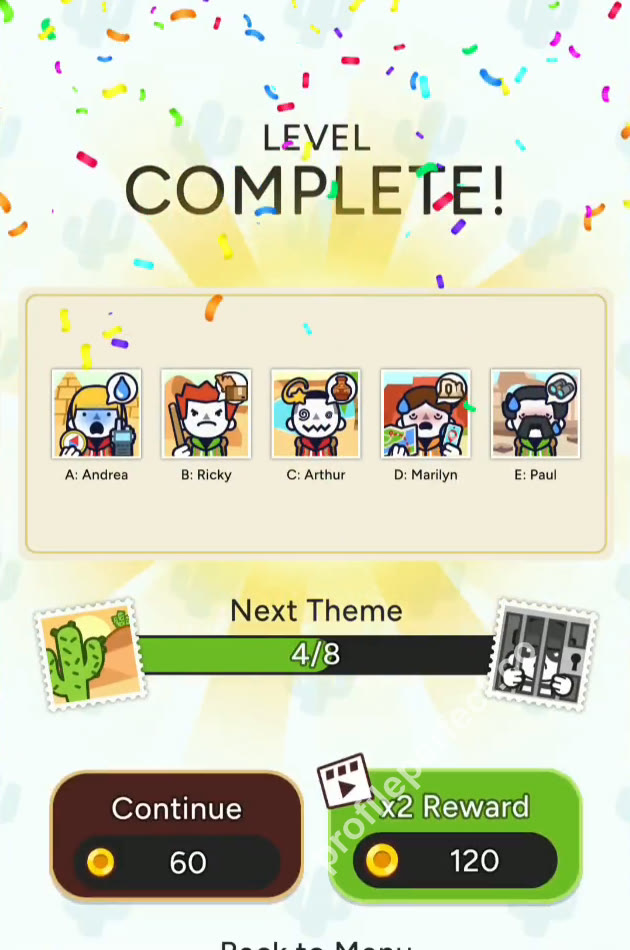
Explorer D and Explorer E are both Tired, so all 25 cells are correct and the level is complete.
Drag the Tired card to Explorer D's and Explorer E's Condition cells (two copies); when the grid is completely filled, the completion screen appears.
Schlüsselmomente
Drei Bilder aus dem erfolgreichen Durchlauf: das Anfangsraster, die Mitte der Lösung und das vollständig ausgefüllte Gitter.
Kniffligste Hinweise
Don't merge the two Compass cards
A's tool is Radio / Compass and C's tool is Compass, so the word "Compass" appears on two different tool cards. Place them as separate cards; otherwise the double-tool card on A can accidentally overwrite the single Compass on C. Check the full card label before dragging.
Ruins is both a mission and a location
D is looking for Ruins, but D's own location is Uluru; the Ruins location belongs to E. Since the same word appears in two columns, it is easy to drop Ruins into D's Location by mistake. Let Paul's location set D's mission, then place Uluru as D's spot.
Abschließende Kontrolle
Start by turning the explicit fear clue into a full row, then let the other named explorers expand the grid. The connection between Paul's current Ruins location and Marilyn's mission is the middle link that fixes D and E. After that, the non-neighbor tool clue reduces the remaining choices to simple elimination. Watch the double-tool cards, because they are easy to mistake for single cards.
Kategorien in diesem Level
Jedes Spielfeld mischt alltägliche Kategorien. Durchstöbere die, aus denen dieses Rätsel schöpft – jede verlinkt zu jedem Level, das sie enthält.
Häufig gestellte Fragen
Wie lautet die Lösung zu Profile Perfect Level 195?
Diese Seite enthält das vollständige Lösungsraster für Level 195 "Die Wüstenartefakt-Jagd", geschützt durch eine Spoiler-Warnung – öffne es und kopiere es ins Spiel, oder beginne mit den gestaffelten Tipps, wenn du es zuerst selbst lösen möchtest.
Wie viele Tipps gibt es für Profile Perfect Level 195?
Drei, mit steigender Stärke: ein sanfter Schubs, der entscheidende Hinweis genannt, dann der entscheidende Schritt. Tipps werden nacheinander freigeschaltet, sodass du aufhören kannst, sobald der Fall klar ist.
Wie löse ich Profile Perfect Level 195 ohne Booster?
Befolge den Schritt-für-Schritt-Abschnitt: verankere zuerst die direkten Hinweise, streife negative Hinweise auf Ausschlüsse ab, dann verknüpfe die Positions- und Vergleichshinweise. Level 195 ist vollständig lösbar, ohne einen einzigen Booster auszugeben.
Warum habe ich bei Profile Perfect Level 195 ein Leben verloren?
Ein Tippen auf ein unbewiesenes Paar kostet einen Versuch. Die Liste der kniffligen Hinweise auf dieser Seite deckt die genauen Zellen ab, die Spieler auf diesem Brett falsch antippen – überprüfe sie doppelt, bevor du dich festlegst.
Ist Profile Perfect Level 195 schwer?
Das Brett "Die Wüstenartefakt-Jagd" hat den erwarteten Schwierigkeitsgrad für diesen Abschnitt: eine angemessene Anzahl von Hinweisen mit ein oder zwei leicht falsch lesbaren Formulierungen. Wenn du der Tipp-Reihenfolge folgst, bleibt es angenehm.
Welches Level kommt nach Profile Perfect Level 195?
Level 196. Verwende die Zurück-/Weiter-Buttons unten auf dieser Seite oder springe zurück zum vollständigen Level-Index, um nach Nummer zu suchen.