






Profile Perfect 第 195 關提示與解答
「沙漠文物探索」——四層階梯:一鍵解答、漸進式提示、邏輯解說、完整解答。你只需要選取所需的層級。
答案
只為了答案而來?打開下方面板,將網格複製到遊戲中——其他內容都不會洩漏。
劇透顯示答案網格
| 對象 | 物件 | 人物 | 任務 | Guiding Tool | 狀態 | 地點 |
|---|---|---|---|---|---|---|
| 探險家A | Andrea | 水 | Radio / Compass | 害怕 | 金字塔 | |
| 探險家B | Ricky | Camel / Delivery | Stick | 生氣 | Nowhere | |
| 探險家C | Arthur | 文物 | 指南針 | Fainted | 綠洲 | |
| 探險家D | Marilyn | 遺跡 | GPS / Map | 疲倦 | Uluru | |
| 探險家E | Paul | Exploration | Intuition | 疲倦 | 遺跡 |
提示
提示會逐一解鎖:開啟提示 1 後,提示 2 才會出現。一旦案件豁然開朗,就停下來。
提示 1 點擊顯示
Start with the explorer whose fear directly reveals their name and their mission.
提示 2 點擊顯示
Lock onto the explorer who travels by his own knowledge; the place he is investigating becomes another explorer's mission.
提示 3 點擊顯示
Use the stick-and-GPS non-neighbor clue to place the tool cards, then fill the leftover locations and conditions.
影片攻略
觀看完整解謎過程:棋盤、線索卡,以及每一步的擺放順序——每個步驟都對應到遊戲中的那一刻。
-
1 Andrea fears dehydration 0:00 – 0:07
Andrea is scared that she would not survive dehydration, so Explorer A's Person is Andrea, Condition is Scared, and Mission is Water.
Drag the Andrea card to Explorer A's Person cell, the Scared card to Explorer A's Condition cell, and the Water card to Explorer A's Mission cell.
-
2 Fainted explorer looks for Artifact 0:07 – 0:14
The fainted explorer was looking for the ancient Artifact, so Explorer C's Condition is Fainted, Mission is Artifact, and Person is Arthur.
Drag the Fainted card to Explorer C's Condition cell, the Artifact card to Explorer C's Mission cell, and the Arthur card to Explorer C's Person cell.
-
3 E relies on his own knowledge 0:14 – 0:21
Explorer E is confident to travel with his knowledge alone, so Explorer E's Guiding Tool is Intuition, Person is Paul, and Mission is Exploration.
Drag the Intuition card to Explorer E's Guiding Tool cell, the Paul card to Explorer E's Person cell, and the Exploration card to Explorer E's Mission cell.
-
4 Marilyn tracks Paul's Ruins 0:21 – 0:28
Marilyn's goal is to find what Paul is currently exploring, so Explorer D's Person is Marilyn and Mission is Ruins, while Explorer E's Location is Ruins. Since no Camel can be found anywhere in Uluru, Explorer D's Location is Uluru.
Drag the Marilyn card to Explorer D's Person cell, the Ruins mission card to Explorer D's Mission cell, the Ruins location card to Explorer E's Location cell, and the Uluru card to Explorer D's Location cell.
-
5 Stick is not next to GPS 0:28 – 0:35
The Stick is not neighbors with the GPS, so Explorer B's Guiding Tool is Stick, Explorer D's is GPS / Map, and Explorer A's is Radio / Compass.
Drag the Stick card to Explorer B's Guiding Tool cell, the GPS / Map card to Explorer D's Guiding Tool cell, and the Radio / Compass card to Explorer A's Guiding Tool cell.
-
6 Ricky finishes row B 0:35 – 0:42
Explorer B's Person is Ricky, Mission is Camel / Delivery, Condition is Angry, and Location is Nowhere.
Drag the Ricky card to Explorer B's Person cell, the Camel / Delivery card to Explorer B's Mission cell, the Angry card to Explorer B's Condition cell, and the Nowhere card to Explorer B's Location cell.
-
7 Location and tool cleanup 0:42 – 0:46
Explorer A's Location is Pyramid, Explorer C's Location is Oasis, and Explorer C's Guiding Tool is Compass.
Drag the Pyramid card to Explorer A's Location cell, the Oasis card to Explorer C's Location cell, and the Compass card to Explorer C's Guiding Tool cell.
-
8 Tired condition finish 0:46 – 0:50
Explorer D and Explorer E are both Tired, so all 25 cells are correct and the level is complete.
Drag the Tired card to Explorer D's and Explorer E's Condition cells (two copies); when the grid is completely filled, the completion screen appears.
關鍵時刻
通關過程中的三個畫面:開局棋盤、解謎中期,以及完成後的網格。
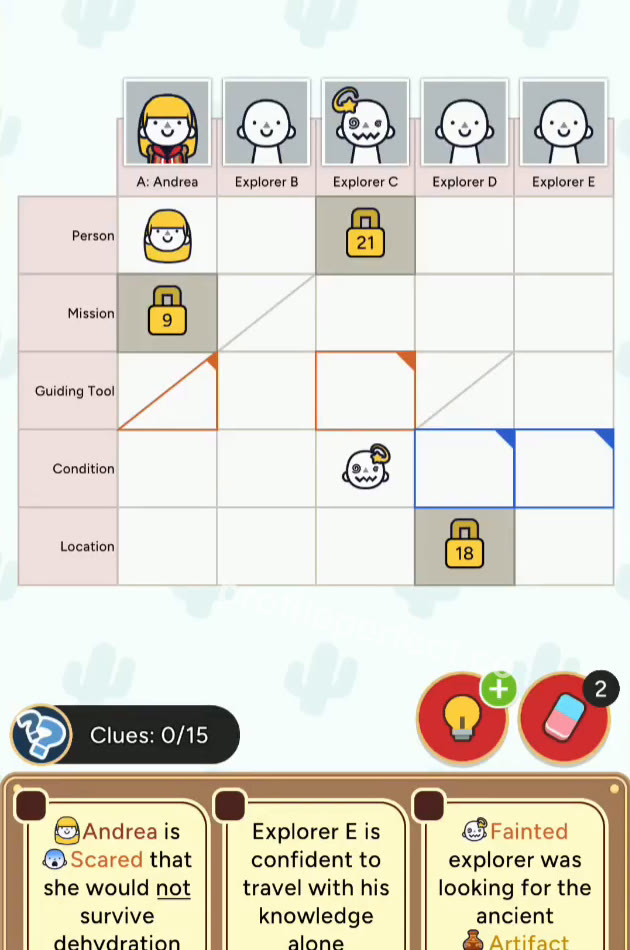
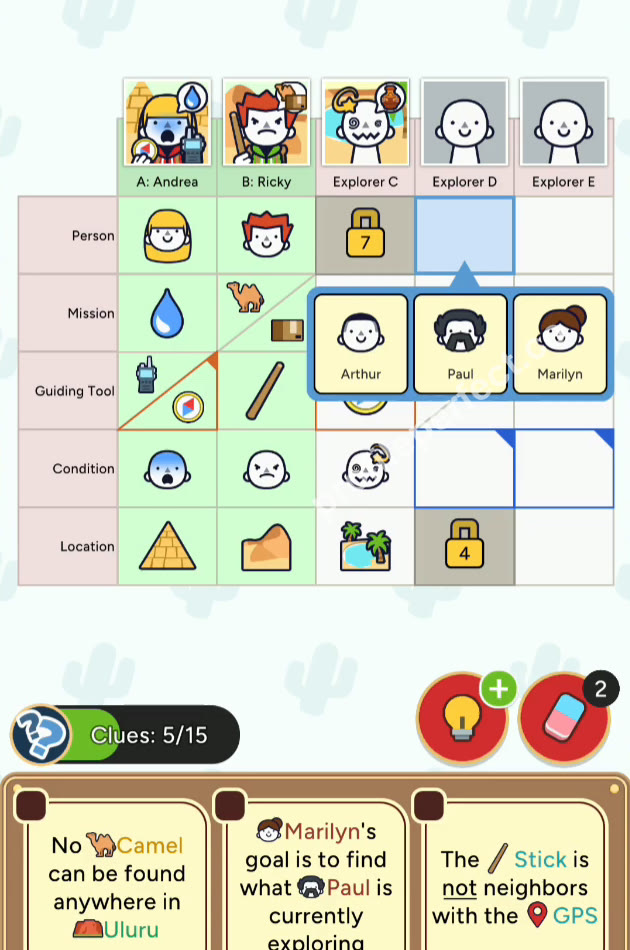
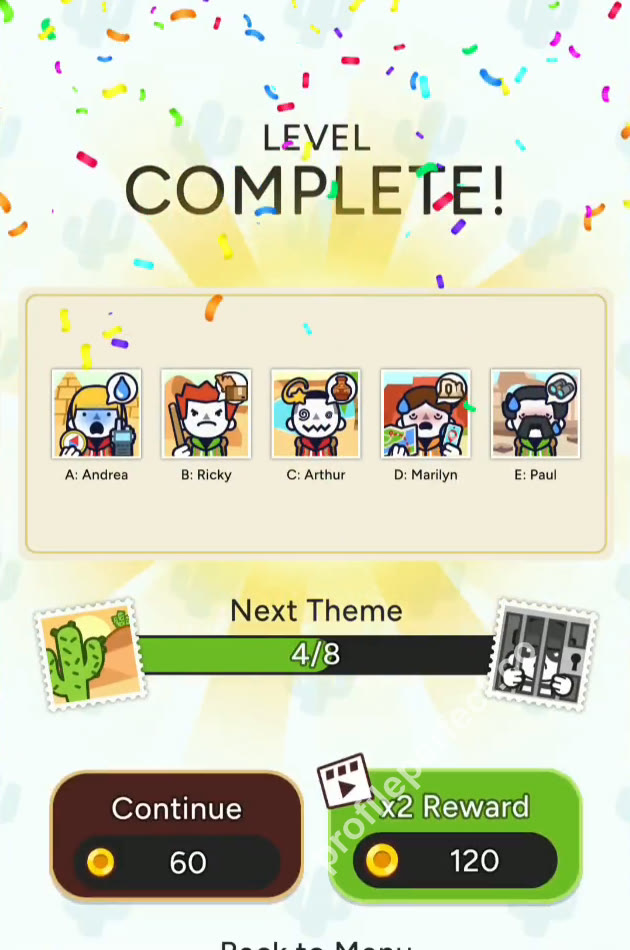
最棘手的線索
Don't merge the two Compass cards
A's tool is Radio / Compass and C's tool is Compass, so the word "Compass" appears on two different tool cards. Place them as separate cards; otherwise the double-tool card on A can accidentally overwrite the single Compass on C. Check the full card label before dragging.
Ruins is both a mission and a location
D is looking for Ruins, but D's own location is Uluru; the Ruins location belongs to E. Since the same word appears in two columns, it is easy to drop Ruins into D's Location by mistake. Let Paul's location set D's mission, then place Uluru as D's spot.
最終檢查
Start by turning the explicit fear clue into a full row, then let the other named explorers expand the grid. The connection between Paul's current Ruins location and Marilyn's mission is the middle link that fixes D and E. After that, the non-neighbor tool clue reduces the remaining choices to simple elimination. Watch the double-tool cards, because they are easy to mistake for single cards.
此關卡的類別
每個盤面都混搭日常類別。瀏覽此謎題所使用的類別 — 每個類別都會連接到所有包含它的關卡。
常見問題
Profile Perfect 第195關的答案是什麼?
此頁面提供第195關「沙漠文物探索」的完整答案網格,藏在防雷機制內——開啟後複製到遊戲中,或先從分層提示開始自己解謎。
Profile Perfect 第195關有多少個提示?
三個,力道漸強:輕微引導、指出關鍵線索、最後決定性步驟。提示一次解鎖一個,懂了就可以停手。
如何在不使用強化道具的情況下解 Profile Perfect 第195關?
依照逐步攻略:先固定直接線索,再用否定線索進行排除,最後串聯位置與比較線索。第195關完全不需要花費任何強化道具即可解開。
為什麼我在 Profile Perfect 第195關失去一條命?
點擊未經證實的配對會消耗一次嘗試。此頁面的「棘手線索」列表涵蓋玩家在此棋盤上容易誤點的格子——確認無誤再下手。
Profile Perfect 第195關困難嗎?
「沙漠文物探索」棋盤的難度符合這個階段的預期:線索數量合理,有一兩個容易誤解的措辭。按照提示順序就能輕鬆過關。
Profile Perfect 第195關之後是哪一關?
第196關。使用本頁底部的上一關/下一關按鈕,或返回完整關卡索引按編號瀏覽。