






Profile Perfect Niveau 195 : Astuces et Solution
"La chasse aux artefacts du désert" — une échelle en quatre niveaux : une solution en un clic, des astuces progressives, la logique expliquée, et la solution complète. Prenez seulement l'étape dont vous avez besoin.
Solution
Vous êtes ici uniquement pour la solution ? Ouvrez le panneau ci-dessous et copiez la grille dans le jeu — rien d'autre ne sera dévoilé.
SpoilerRévéler la grille de solution
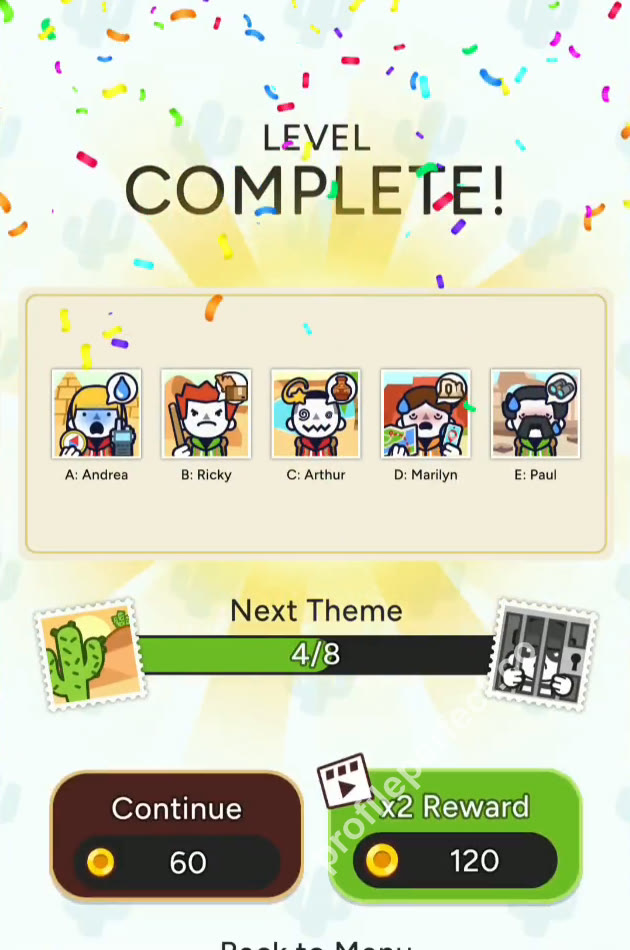
| Personnage | Personnages | Personne | Mission | Guiding Tool | État | Lieu |
|---|---|---|---|---|---|---|
| Explorateur A | Andrea | Eau | Radio / Compass | Effrayé | Pyramide | |
| Explorateur B | Ricky | Camel / Delivery | Stick | Fâché | Nowhere | |
| Explorateur C | Arthur | Artefact | Boussole | Fainted | Oasis | |
| Explorateur D | Marilyn | Ruines | GPS / Map | Fatigué | Uluru | |
| Explorateur E | Paul | Exploration | Intuition | Fatigué | Ruines |
Astuces
Les astuces se déverrouillent une par une : ouvrez l'astuce 1, et alors seulement l'astuce 2 apparaît. Arrêtez dès que le dossier devient clair.
Astuce 1 Appuyez pour révéler
Start with the explorer whose fear directly reveals their name and their mission.
Astuce 2 Appuyez pour révéler
Lock onto the explorer who travels by his own knowledge; the place he is investigating becomes another explorer's mission.
Astuce 3 Appuyez pour révéler
Use the stick-and-GPS non-neighbor clue to place the tool cards, then fill the leftover locations and conditions.
Guide vidéo
Regardez la résolution complète : la grille, les cartes d'indices, et chaque placement dans l'ordre — chaque étape ci-dessous est liée au moment où elle se produit dans la partie.
-
1 Andrea fears dehydration 0:00 – 0:07
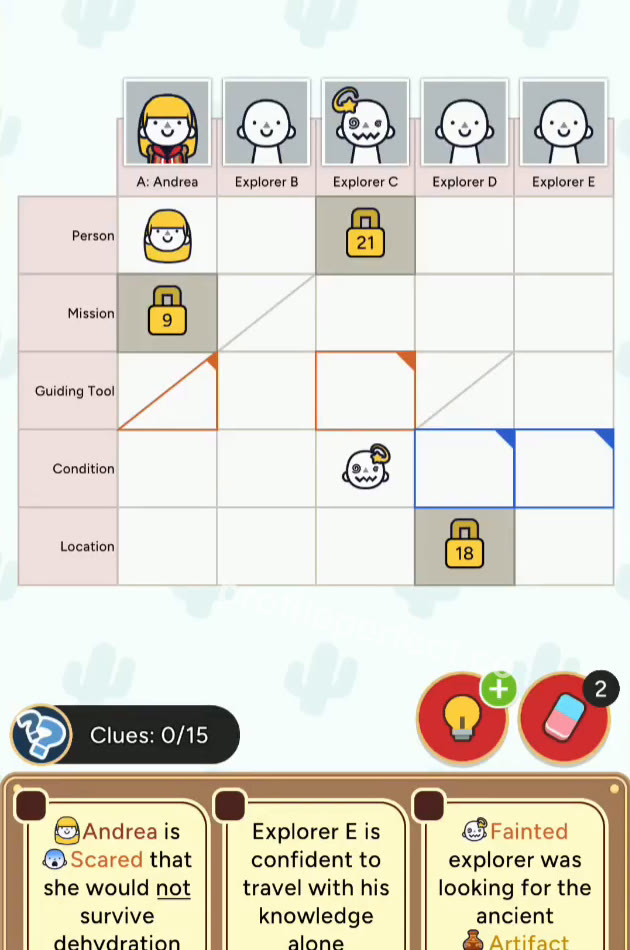
Andrea is scared that she would not survive dehydration, so Explorer A's Person is Andrea, Condition is Scared, and Mission is Water.
Drag the Andrea card to Explorer A's Person cell, the Scared card to Explorer A's Condition cell, and the Water card to Explorer A's Mission cell.
-
2 Fainted explorer looks for Artifact 0:07 – 0:14
The fainted explorer was looking for the ancient Artifact, so Explorer C's Condition is Fainted, Mission is Artifact, and Person is Arthur.
Drag the Fainted card to Explorer C's Condition cell, the Artifact card to Explorer C's Mission cell, and the Arthur card to Explorer C's Person cell.
-
3 E relies on his own knowledge 0:14 – 0:21
Explorer E is confident to travel with his knowledge alone, so Explorer E's Guiding Tool is Intuition, Person is Paul, and Mission is Exploration.
Drag the Intuition card to Explorer E's Guiding Tool cell, the Paul card to Explorer E's Person cell, and the Exploration card to Explorer E's Mission cell.
-
4 Marilyn tracks Paul's Ruins 0:21 – 0:28
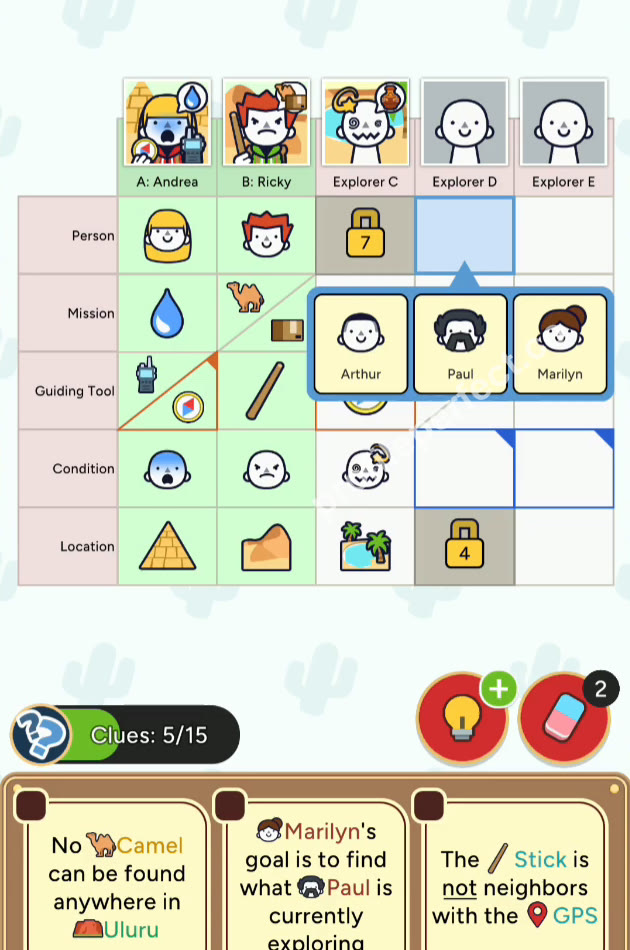
Marilyn's goal is to find what Paul is currently exploring, so Explorer D's Person is Marilyn and Mission is Ruins, while Explorer E's Location is Ruins. Since no Camel can be found anywhere in Uluru, Explorer D's Location is Uluru.
Drag the Marilyn card to Explorer D's Person cell, the Ruins mission card to Explorer D's Mission cell, the Ruins location card to Explorer E's Location cell, and the Uluru card to Explorer D's Location cell.
-
5 Stick is not next to GPS 0:28 – 0:35
The Stick is not neighbors with the GPS, so Explorer B's Guiding Tool is Stick, Explorer D's is GPS / Map, and Explorer A's is Radio / Compass.
Drag the Stick card to Explorer B's Guiding Tool cell, the GPS / Map card to Explorer D's Guiding Tool cell, and the Radio / Compass card to Explorer A's Guiding Tool cell.
-
6 Ricky finishes row B 0:35 – 0:42
Explorer B's Person is Ricky, Mission is Camel / Delivery, Condition is Angry, and Location is Nowhere.
Drag the Ricky card to Explorer B's Person cell, the Camel / Delivery card to Explorer B's Mission cell, the Angry card to Explorer B's Condition cell, and the Nowhere card to Explorer B's Location cell.
-
7 Location and tool cleanup 0:42 – 0:46
Explorer A's Location is Pyramid, Explorer C's Location is Oasis, and Explorer C's Guiding Tool is Compass.
Drag the Pyramid card to Explorer A's Location cell, the Oasis card to Explorer C's Location cell, and the Compass card to Explorer C's Guiding Tool cell.
-
8 Tired condition finish 0:46 – 0:50
Explorer D and Explorer E are both Tired, so all 25 cells are correct and the level is complete.
Drag the Tired card to Explorer D's and Explorer E's Condition cells (two copies); when the grid is completely filled, the completion screen appears.
Moments clés
Trois images de la partie gagnante : la grille de départ, à mi-résolution, et la grille terminée.
Indices les plus délicats
Don't merge the two Compass cards
A's tool is Radio / Compass and C's tool is Compass, so the word "Compass" appears on two different tool cards. Place them as separate cards; otherwise the double-tool card on A can accidentally overwrite the single Compass on C. Check the full card label before dragging.
Ruins is both a mission and a location
D is looking for Ruins, but D's own location is Uluru; the Ruins location belongs to E. Since the same word appears in two columns, it is easy to drop Ruins into D's Location by mistake. Let Paul's location set D's mission, then place Uluru as D's spot.
Vérification finale
Start by turning the explicit fear clue into a full row, then let the other named explorers expand the grid. The connection between Paul's current Ruins location and Marilyn's mission is the middle link that fixes D and E. After that, the non-neighbor tool clue reduces the remaining choices to simple elimination. Watch the double-tool cards, because they are easy to mistake for single cards.
Catégories dans ce niveau
Chaque plateau mélange des catégories courantes. Parcourez celles dont ce puzzle s'inspire — chacune renvoie à tous les niveaux qui la comportent.
Foire aux questions
Quelle est la solution du niveau 195 de Profile Perfect ?
Cette page contient la grille de solution complète du niveau 195 "La chasse aux artefacts du désert", protégée par un voile de spoiler — ouvrez-la et copiez-la dans le jeu, ou commencez par les astuces progressives si vous voulez d'abord résoudre par vous-même.
Combien d'astuces y a-t-il pour le niveau 195 de Profile Perfect ?
Trois, par ordre croissant : un léger coup de pouce, l'indice clé signalé, puis l'étape décisive. Les astuces se débloquent une par une, vous pouvez donc vous arrêter dès que le dossier s'éclaire.
Comment résoudre le niveau 195 de Profile Perfect sans boosters ?
Suivez la section pas à pas : ancrez d'abord les indices directs, balayez les indices négatifs pour les éliminations, puis enchaînez les indices de position et de comparaison. Le niveau 195 est entièrement résoluble sans dépenser un seul booster.
Pourquoi ai-je perdu une vie au niveau 195 de Profile Perfect ?
Un appui sur une association non prouvée brûle une tentative. La liste des indices délicats sur cette page couvre les cellules exactes que les joueurs tapent par erreur sur cette grille — vérifiez-les avant de vous engager.
Le niveau 195 de Profile Perfect est-il difficile ?
La grille "La chasse aux artefacts du désert" se situe à la difficulté attendue pour cette section : un nombre d'indices équitable avec une ou deux formulations faciles à mal interpréter. Suivre l'ordre des astuces la rend confortable.
Quel niveau vient après le niveau 195 de Profile Perfect ?
Niveau 196. Utilisez les boutons précédent / suivant en bas de cette page, ou revenez à l'index complet des niveaux pour parcourir par numéro.