






Profile Perfect Nivel 195 — Pista por pista y solución
"La caza de artefactos del desierto" — una escalera de cuatro capas: una solución con un clic, pistas por pista que aumentan, la lógica explicada y la solución completa. Toma solo la capa que necesitas.
Solución
¿Solo buscas la solución? Abre el panel de abajo y copia la cuadrícula en el juego: no se estropea nada más.
SpoilerRevelar la cuadrícula de solución
| Personajes | Personajes | Persona | Misión | Guiding Tool | Estado | Lugar |
|---|---|---|---|---|---|---|
| Explorador A | Andrea | Agua | Radio / Compass | Asustado | Pirámide | |
| Explorador B | Ricky | Camel / Delivery | Stick | Enojado | Nowhere | |
| Explorador C | Arthur | Artefacto | Brújula | Fainted | Oasis | |
| Explorador D | Marilyn | Ruinas | GPS / Map | Cansado | Uluru | |
| Explorador E | Paul | Exploration | Intuition | Cansado | Ruinas |
Pistas por pista
Las pistas por pista se desbloquean una a una: abre la Pista por pista 1, y solo entonces aparece la Pista por pista 2. Detente en cuanto el caso haga clic.
Pista por pista 1 Toca para revelar
Start with the explorer whose fear directly reveals their name and their mission.
Pista por pista 2 Toca para revelar
Lock onto the explorer who travels by his own knowledge; the place he is investigating becomes another explorer's mission.
Pista por pista 3 Toca para revelar
Use the stick-and-GPS non-neighbor clue to place the tool cards, then fill the leftover locations and conditions.
Videoguía
Mira la resolución completa: el tablero, las tarjetas de pistas del caso y cada colocación en orden — cada paso más abajo está anclado al momento en que ocurre en la ejecución.
-
1 Andrea fears dehydration 0:00 – 0:07
Andrea is scared that she would not survive dehydration, so Explorer A's Person is Andrea, Condition is Scared, and Mission is Water.
Drag the Andrea card to Explorer A's Person cell, the Scared card to Explorer A's Condition cell, and the Water card to Explorer A's Mission cell.
-
2 Fainted explorer looks for Artifact 0:07 – 0:14
The fainted explorer was looking for the ancient Artifact, so Explorer C's Condition is Fainted, Mission is Artifact, and Person is Arthur.
Drag the Fainted card to Explorer C's Condition cell, the Artifact card to Explorer C's Mission cell, and the Arthur card to Explorer C's Person cell.
-
3 E relies on his own knowledge 0:14 – 0:21
Explorer E is confident to travel with his knowledge alone, so Explorer E's Guiding Tool is Intuition, Person is Paul, and Mission is Exploration.
Drag the Intuition card to Explorer E's Guiding Tool cell, the Paul card to Explorer E's Person cell, and the Exploration card to Explorer E's Mission cell.
-
4 Marilyn tracks Paul's Ruins 0:21 – 0:28
Marilyn's goal is to find what Paul is currently exploring, so Explorer D's Person is Marilyn and Mission is Ruins, while Explorer E's Location is Ruins. Since no Camel can be found anywhere in Uluru, Explorer D's Location is Uluru.
Drag the Marilyn card to Explorer D's Person cell, the Ruins mission card to Explorer D's Mission cell, the Ruins location card to Explorer E's Location cell, and the Uluru card to Explorer D's Location cell.
-
5 Stick is not next to GPS 0:28 – 0:35
The Stick is not neighbors with the GPS, so Explorer B's Guiding Tool is Stick, Explorer D's is GPS / Map, and Explorer A's is Radio / Compass.
Drag the Stick card to Explorer B's Guiding Tool cell, the GPS / Map card to Explorer D's Guiding Tool cell, and the Radio / Compass card to Explorer A's Guiding Tool cell.
-
6 Ricky finishes row B 0:35 – 0:42
Explorer B's Person is Ricky, Mission is Camel / Delivery, Condition is Angry, and Location is Nowhere.
Drag the Ricky card to Explorer B's Person cell, the Camel / Delivery card to Explorer B's Mission cell, the Angry card to Explorer B's Condition cell, and the Nowhere card to Explorer B's Location cell.
-
7 Location and tool cleanup 0:42 – 0:46
Explorer A's Location is Pyramid, Explorer C's Location is Oasis, and Explorer C's Guiding Tool is Compass.
Drag the Pyramid card to Explorer A's Location cell, the Oasis card to Explorer C's Location cell, and the Compass card to Explorer C's Guiding Tool cell.
-
8 Tired condition finish 0:46 – 0:50
Explorer D and Explorer E are both Tired, so all 25 cells are correct and the level is complete.
Drag the Tired card to Explorer D's and Explorer E's Condition cells (two copies); when the grid is completely filled, the completion screen appears.
Momentos clave
Tres fotogramas de la ejecución ganadora: el tablero inicial, a mitad de resolución y la rejilla completada.
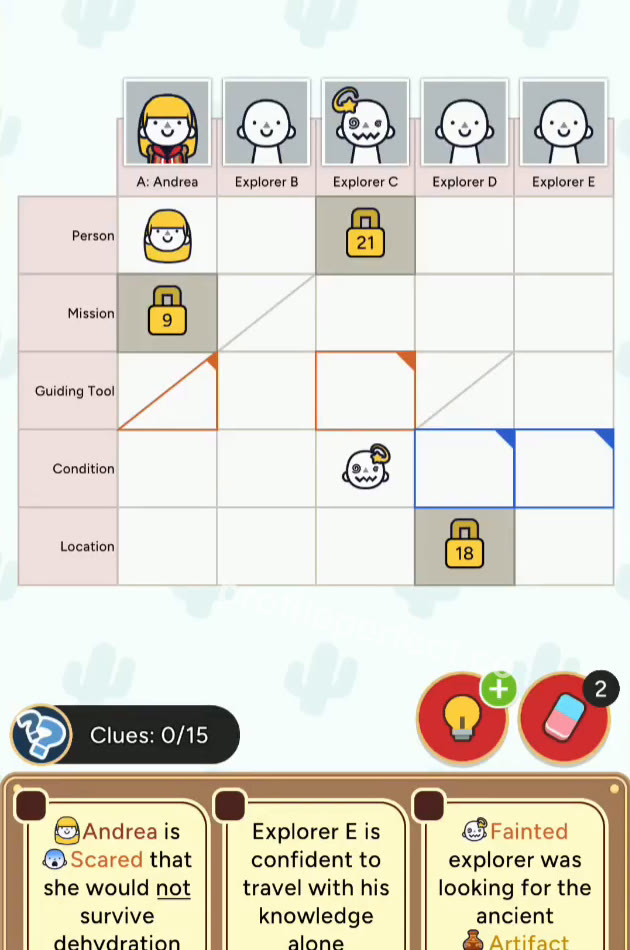
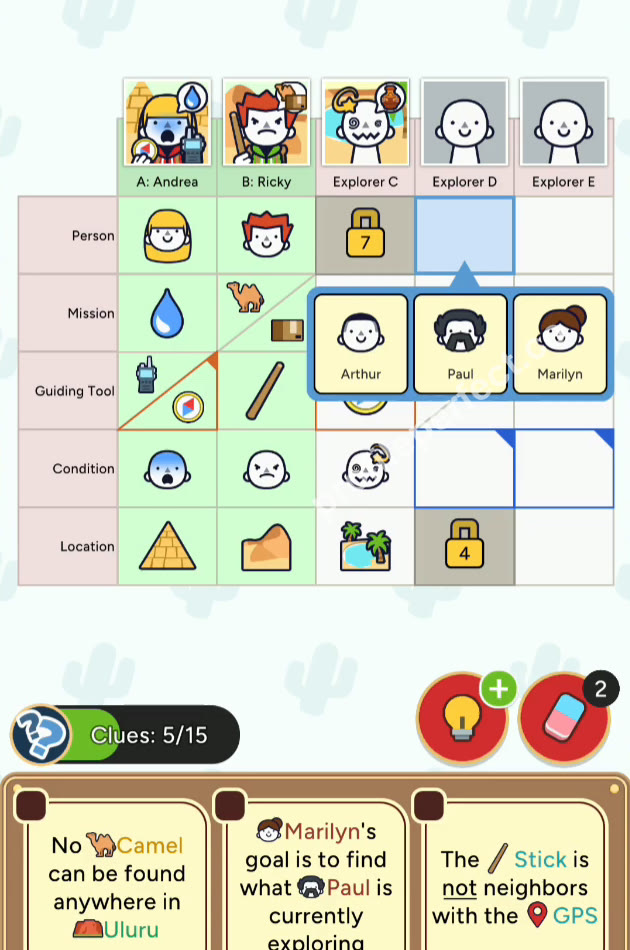
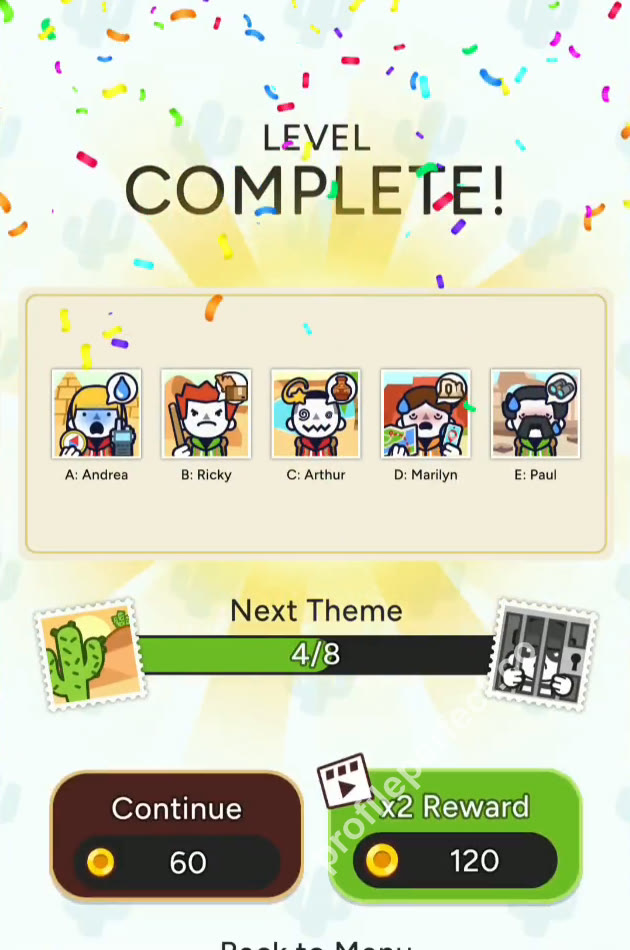
Pistas del caso más engañosas
Don't merge the two Compass cards
A's tool is Radio / Compass and C's tool is Compass, so the word "Compass" appears on two different tool cards. Place them as separate cards; otherwise the double-tool card on A can accidentally overwrite the single Compass on C. Check the full card label before dragging.
Ruins is both a mission and a location
D is looking for Ruins, but D's own location is Uluru; the Ruins location belongs to E. Since the same word appears in two columns, it is easy to drop Ruins into D's Location by mistake. Let Paul's location set D's mission, then place Uluru as D's spot.
Comprobación final
Start by turning the explicit fear clue into a full row, then let the other named explorers expand the grid. The connection between Paul's current Ruins location and Marilyn's mission is the middle link that fixes D and E. After that, the non-neighbor tool clue reduces the remaining choices to simple elimination. Watch the double-tool cards, because they are easy to mistake for single cards.
Categorías en este nivel
Cada tablero mezcla categorías cotidianas. Explora las que utiliza este rompecabezas — cada una enlaza a todos los niveles que la incluyen.
Preguntas frecuentes
¿Cuál es la solución del nivel 195 de Profile Perfect?
Esta página tiene la cuadrícula de solución completa del nivel 195 "La caza de artefactos del desierto", guardada dentro de una protección contra spoilers: ábrela y cópiala en el juego, o comienza con las pistas por pista si quieres resolverlo tú primero.
¿Cuántas pistas por pista hay para el nivel 195 de Profile Perfect?
Tres, en intensidad creciente: un empujón suave, la pista del caso clave señalada, luego el paso decisivo. Las pistas por pista se desbloquean una a una, para que puedas parar en cuanto el caso tenga sentido.
¿Cómo resolver el nivel 195 de Profile Perfect sin potenciadores?
Sigue la sección paso a paso: ancla primero las pistas directas, barre las pistas negativas para eliminaciones, luego encadena las pistas de posición y de comparación. El nivel 195 se puede resolver completamente sin gastar un solo potenciador.
¿Por qué perdí una vida en el nivel 195 de Profile Perfect?
Un toque en un par no comprobado quema un intento. La lista de Pistas del Caso Engañosas en esta página cubre las celdas exactas donde los jugadores tocan mal en este tablero: verifícalas antes de confirmar.
¿El nivel 195 de Profile Perfect es difícil?
El tablero "La caza de artefactos del desierto" está en la dificultad esperada para este tramo: una cantidad justa de pistas del caso con una o dos redacciones fáciles de malinterpretar. Seguir el orden de las pistas por pista lo mantiene cómodo.
¿Qué nivel viene después del nivel 195 de Profile Perfect?
Nivel 196. Usa los botones anterior/siguiente al final de esta página, o vuelve al índice completo de niveles para explorar por número.