






Profile Perfect レベル 307 ヒント&答え
「Fugitives」— ワンクリックで答え、段階的にヒント、ロジック解説、完全攻略の4層構造。必要な層だけをお選びください。
答え
答えだけが必要ですか?以下のパネルを開き、グリッドをゲームにコピーしてください。それ以外の情報は表示されません。
ネタバレ答えのグリッドを表示
| 登場人物 | Subject | Nickname | Weapon | Hideout | Bounty Reward |
|---|---|---|---|---|---|
| Fugitive A | Grim Reaper | Dagger / Axe | Tunnel | $ | |
| Fugitive B | Night Mirage | Shield | Ruins | $ | |
| Fugitive C | Red Vulture | Slingshot / Shuriken | Caravan | $$ | |
| Fugitive D | Golden Viper | Gun | Ruins | $$ |
ヒント
ヒントは一つずつ表示されます。ヒント1を開くと、ヒント2が現れます。ファイルの謎が解けたら、そこで止めてください。
ヒント 1 タップして表示
Fugitive C does not live in a fixed location — C = Caravan; the one nicknamed the Angel of Death always brings a Dagger — Grim Reaper (A) = Dagger / Axe; Red Vulture is a master of projectile weapons — C = Slingshot / Shuriken; the Shield has 3 sharp weapons as neighbors — B = Shield, sitting between A (Dagger + Axe) and C (Shuriken).
ヒント 2 タップして表示
Hunters favor Golden Viper's bounty over the Reaper's — D = $$, A = $; the second highest bounty sits next to the Shield — C = $$ next to B; 2 fugitives sit between the highest and 2nd lowest bounties — D (highest) and A (2nd lowest) frame B and C, so A = $, B = $, C = $$, D = $$; leftover hideouts fill A = Tunnel, B = Ruins, D = Ruins.
動画攻略
完全な解法をご覧ください:盤面、手がかりカード、配置のすべてを順に — 以下の各ステップは、その瞬間に対応しています。
-
1 Read the opening clues 0:00 – 0:03
Note the initial facts.
Fugitive C does not live in a fixed location (C's Hideout = Caravan); the Shield has 3 sharp weapons as neighbors (B's Weapon = Shield, between A and C); the one nicknamed the Angel of Death always brings a Dagger (the Reaper, A, carries the Dagger).
-
2 Set the nicknames from the WANTED cards 0:03 – 0:06
Fill the nickname row.
A's Nickname is Grim Reaper; B's is Night Mirage; C's is Red Vulture; D's is Golden Viper.
-
3 Red Vulture uses projectile weapons 0:06 – 0:09
Set C's weapon.
C's Weapon is Slingshot and Shuriken.
-
4 The Reaper brings the dagger 0:09 – 0:12
Set A's weapon.
Angel of Death is Grim Reaper — A's Weapon is Dagger and Axe.
-
5 The shield's sharp neighbors 0:12 – 0:15
Set B's weapon and position.
B's Weapon is Shield; A holds Dagger + Axe (2 sharp) and C holds Shuriken (1 sharp) = 3 sharp neighbors, so B sits between A and C.
-
6 C lives nowhere fixed 0:15 – 0:18
Set C's hideout.
C's Hideout is Caravan (a moving, non-fixed hideout).
-
7 Rank the bounties 0:18 – 0:24
Set the four bounty rewards.
Hunters favor Golden Viper over the Reaper — D = $$, A = $; the second highest sits next to the Shield — C = $$; 2 fugitives sit between the highest and 2nd lowest — A = $, B = $, C = $$, D = $$.
-
8 Fill the hideouts and verify the grid 0:24 – 0:29
Confirm all 16 cells.
A's Hideout is Tunnel; B's Hideout is Ruins; D's Hideout is Ruins and D's Weapon is Gun. Check 4 fugitives x 4 columns = 16 cells: A=Grim Reaper/Dagger+Axe/Tunnel/$, B=Night Mirage/Shield/Ruins/$, C=Red Vulture/Slingshot+Shuriken/Caravan/$$, D=Golden Viper/Gun/Ruins/$$ — LEVEL COMPLETE appears when all match.
重要な場面
クリア時の3つのフレーム:開始盤面、解法途中、完成したグリッド。
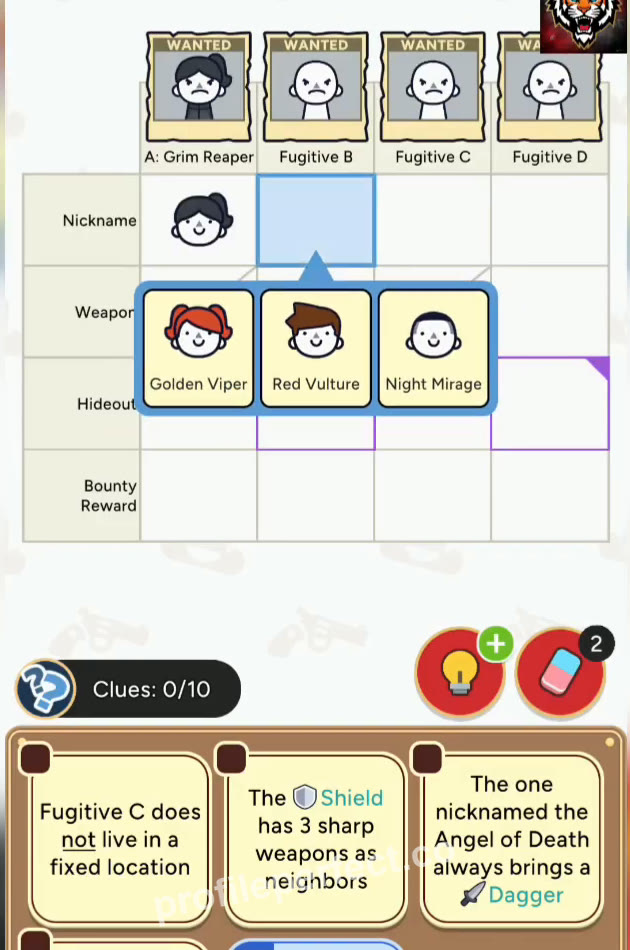
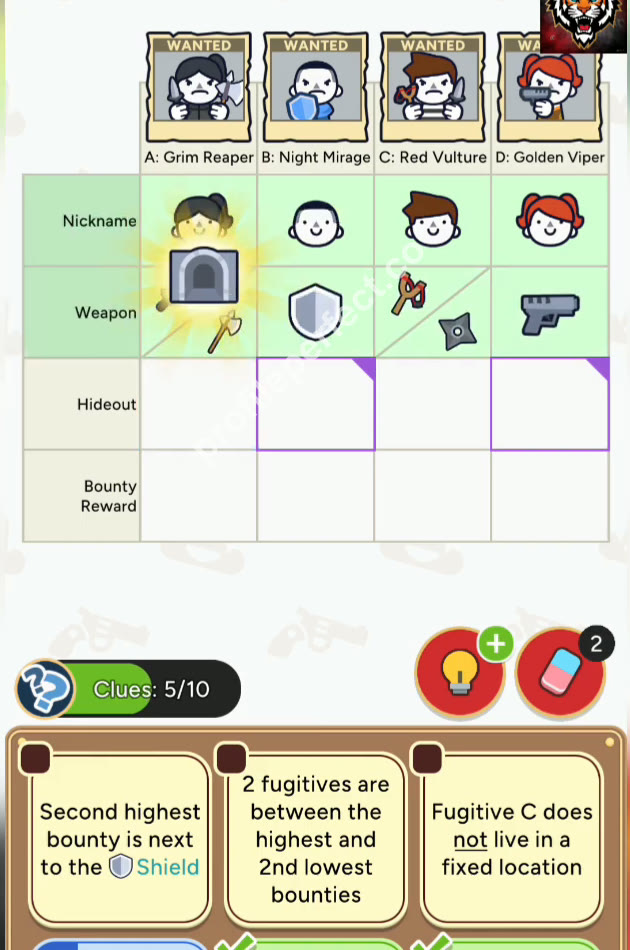

最もトリッキーな手がかり
Giving C a fixed hideout
Fugitive C does not live in a fixed location — C = Caravan. Giving C Ruins or Tunnel breaks the clue.
Putting the Dagger on the wrong fugitive
The one nicknamed the Angel of Death always brings a Dagger — A (Grim Reaper) = Dagger / Axe. Giving the Dagger to B, C or D breaks the clue.
Moving the Shield away from the sharp weapons
The Shield has 3 sharp weapons as neighbors — B = Shield between A (Dagger + Axe) and C (Shuriken). Moving it breaks the clue.
Mixing up the bounties
Hunters favor Golden Viper's bounty over the Reaper's (D = $$, A = $), the second highest is next to the Shield (C = $$), and 2 fugitives sit between the highest and 2nd lowest — A = $, B = $, C = $$, D = $$. Swapping any bounty breaks a clue.
最終チェック
Four fugitives across four categories. The WANTED cards set the nicknames (A = Grim Reaper, B = Night Mirage, C = Red Vulture, D = Golden Viper). Angel of Death carries a Dagger (A = Dagger / Axe), Red Vulture masters projectile weapons (C = Slingshot / Shuriken), and the Shield needs 3 sharp neighbors, pinning B between A and C. C lives nowhere fixed, so C = Caravan. Hunters favor Golden Viper's bounty (D = $$ over A = $), the second highest sits next to the Shield (C = $$), and 2 fugitives sit between the highest and 2nd lowest — A = $, B = $, C = $$, D = $$. Leftover hideouts: A = Tunnel, B = Ruins, D = Ruins. All 16 cells resolve.
よくある質問
Profile Perfect レベル307の答えは?
このページにはレベル307「Fugitives」の完全な答えグリッドがネタバレ防止機能付きで掲載されています。開いてゲームにコピーするか、自分で解きたい場合は段階的なヒントから始めてください。
Profile Perfect レベル307のヒントはいくつありますか?
3つで、強度が段階的に上がります:優しいヒント、キーとなる手がかりの明示、そして決定的なステップ。ヒントは1つずつ解放されるので、パズルが解けた時点で止められます。
Profile Perfect レベル307をブースターなしで解く方法は?
ステップバイステップのセクションに従ってください:まず直接ヒントを確定し、否定ヒントで消去法を適用し、その後位置関係や比較ヒントをつなげます。レベル307はブースターを1つも使わずに完全に解けます。
Profile Perfect レベル307でライフを失ったのはなぜ?
未確定のペアをタップすると試行が消費されます。このページの「紛らわしい手がかり」リストでは、このボードでプレイヤーが誤ってタップしがちなセルを正確にカバーしています。確定する前に再確認してください。
Profile Perfect レベル307はむずかしいですか?
「Fugitives」ボードはこの区間の想定難易度です。手がかり数は適切で、1~2つの読み間違えやすい表現があります。ヒント順に従えば楽に解けます。
Profile Perfect レベル307の次のレベルは?
レベル308です。このページ下部の「前へ」「次へ」ボタンを使うか、全レベル一覧に戻って番号で探してください。