






Profile Perfect Level 157 Hinweise & Lösung
„Das Sportartikel-Regal“ – eine Leiter mit vier Ebenen: eine Lösung auf einen Klick, Hinweise, die schrittweise stärker werden, die erklärte Logik und die vollständige Lösung. Nimm nur die Ebene, die du brauchst.
Lösung
Nur wegen der Lösung hier? Öffne das Panel unten und kopiere das Gitter ins Spiel – nichts anderes wird verraten.
SpoilerLösungsgitter anzeigen
| Person | Personen | Sport | Farbe | Marke | Beliebtheit | Preis |
|---|---|---|---|---|---|---|
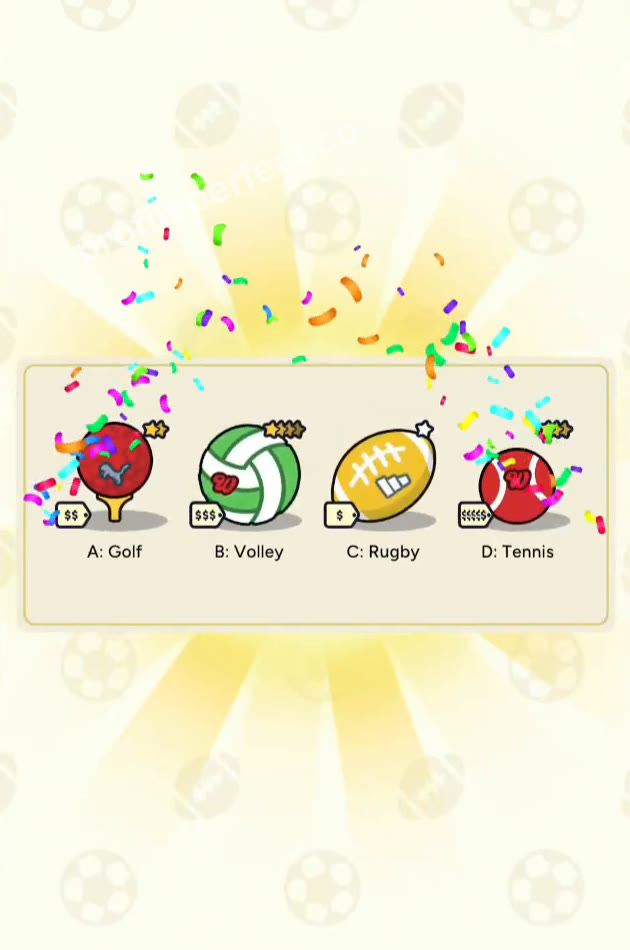
| Ball A | Golf | Rot | Pumba | Star2 | $ | |
| Ball B | Volley | Grün | Walson | Star4 | $$ | |
| Ball C | Rugby | Gelb | Adibas | Star1 | $ | |
| Ball D | Tennis | Rot | Walson | Star3 | $$ |
Tipps
Tipps werden nacheinander freigeschaltet: Öffne Tipp 1, und erst dann erscheint Tipp 2. Höre auf, sobald der Fall klar ist.
Tipp 1 Tippen zum Anzeigen
Find the ball that already has its sport marked, and use it to lock down one brand and one color.
Tipp 2 Tippen zum Anzeigen
The clue about the smallest court gives you the second ball; keep its brand in mind for the later price clue.
Tipp 3 Tippen zum Anzeigen
When you know the cheapest ball, remember it is also the least popular, and the Pumba brand sits one step above it.
Video-Anleitung
Sehen Sie sich die vollständige Lösung an: das Raster, die Hinweiskarten und jede Platzierung in der richtigen Reihenfolge – jeder Schritt unten ist mit dem Moment verknüpft, in dem er im Durchlauf passiert.
-
1 Ball A: Golf, Pumba, Red 0:00 – 0:05
Lock in Ball A's sport as Golf, its brand as Pumba, and its color as Red.
Confirm Ball A's Sport cell is Golf, drag the Pumba brand card to Ball A's Brand cell, and drag the Red color card to Ball A's Color cell.
-
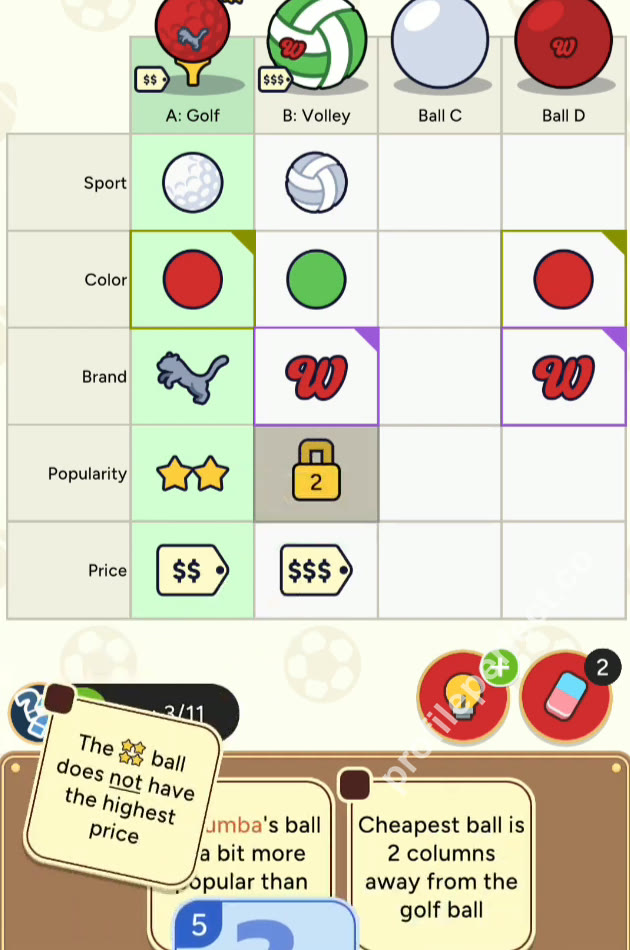
2 Ball B: Volley, Walson 0:05 – 0:11
Set Ball B as Volley and brand Walson.
Drag the Volley card to Ball B's Sport cell and the Walson brand card to Ball B's Brand cell; Clues progress reaches 2/11.
-
3 Ball C: Rugby, Yellow, Adibas 0:11 – 0:16
Set Ball C as Rugby, brand Adibas, and color Yellow.
Drag the Rugby card to Ball C's Sport cell, the Adibas brand card to Ball C's Brand cell, and the Yellow color card to Ball C's Color cell; Clues progress reaches 4/11.
-
4 Ball C: Cheapest and One-Star 0:16 – 0:23
Make Ball C the cheapest price tier and give it one-star popularity.
Drag the $ cheapest-tier price card to Ball C's Price cell and the Star1 popularity card to Ball C's Popularity cell.
-
5 Ball A: Star2 and $; Ball D: Tennis 0:23 – 0:27
Set Ball A's popularity to Star2 and price to $, and set Ball D's sport as Tennis.
Drag the Star2 popularity card to Ball A's Popularity cell, the $ price card to Ball A's Price cell, and the Tennis card to Ball D's Sport cell.
-
6 B and D: Expensive $$ Tier 0:27 – 0:31
Set both Ball B and Ball D to the more expensive price tier ($$).
Drag the $$ price card to Ball B's Price cell and Ball D's Price cell; Clues progress reaches 8/11.
-
7 Finish the Grid: B and D Remaining Cells 0:31 – 0:35
Fill the remaining cells to complete the grid and trigger the ball showcase ending.
Drag Green to Ball B's Color cell, Star4 to Ball B's Popularity cell, Red to Ball D's Color cell, Walson to Ball D's Brand cell, and Star3 to Ball D's Popularity cell. Once all cells are full, the ball showcase settlement screen appears.
Schlüsselmomente
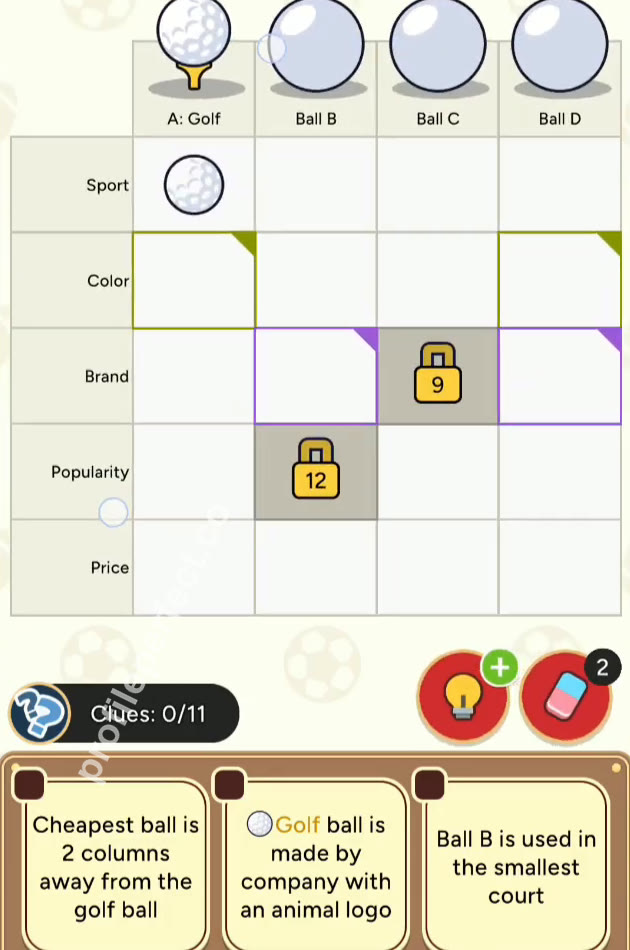
Drei Bilder aus dem erfolgreichen Durchlauf: das Anfangsraster, die Mitte der Lösung und das vollständig ausgefüllte Gitter.
Kniffligste Hinweise
Animal logo clue
At the start, Ball A is already golf, but all three brands are offered. If you ignore the 'animal logo company' clue, you may put Walson or Adibas on A. Always read why the brand appears before dragging.
Don't swap price and popularity
The cheapest ball is also the least popular, and Pumba's ball is only one step more popular. Players often give C Star2 because they read 'a bit more popular' too early. Mark C's $ and Star1 first, then give A Star2.
Abschließende Kontrolle
Start with what is already given instead of guessing. Once the golf ball locks Pumba and red, use the court clue to place volleyball, then rugby clears the middle. The price and popularity clues are linked: the cheapest ball is one-star, while Pumba's ball sits one step higher. Finish with the shared Walson brand to put B and D in the expensive tier, and the leftovers complete the grid.
Häufig gestellte Fragen
Wie lautet die Lösung zu Profile Perfect Level 157?
Diese Seite enthält das vollständige Lösungsraster für Level 157 "Das Sportartikel-Regal", geschützt durch eine Spoiler-Warnung – öffne es und kopiere es ins Spiel, oder beginne mit den gestaffelten Tipps, wenn du es zuerst selbst lösen möchtest.
Wie viele Tipps gibt es für Profile Perfect Level 157?
Drei, mit steigender Stärke: ein sanfter Schubs, der entscheidende Hinweis genannt, dann der entscheidende Schritt. Tipps werden nacheinander freigeschaltet, sodass du aufhören kannst, sobald der Fall klar ist.
Wie löse ich Profile Perfect Level 157 ohne Booster?
Befolge den Schritt-für-Schritt-Abschnitt: verankere zuerst die direkten Hinweise, streife negative Hinweise auf Ausschlüsse ab, dann verknüpfe die Positions- und Vergleichshinweise. Level 157 ist vollständig lösbar, ohne einen einzigen Booster auszugeben.
Warum habe ich bei Profile Perfect Level 157 ein Leben verloren?
Ein Tippen auf ein unbewiesenes Paar kostet einen Versuch. Die Liste der kniffligen Hinweise auf dieser Seite deckt die genauen Zellen ab, die Spieler auf diesem Brett falsch antippen – überprüfe sie doppelt, bevor du dich festlegst.
Ist Profile Perfect Level 157 schwer?
Das Brett "Das Sportartikel-Regal" hat den erwarteten Schwierigkeitsgrad für diesen Abschnitt: eine angemessene Anzahl von Hinweisen mit ein oder zwei leicht falsch lesbaren Formulierungen. Wenn du der Tipp-Reihenfolge folgst, bleibt es angenehm.
Welches Level kommt nach Profile Perfect Level 157?
Level 158. Verwende die Zurück-/Weiter-Buttons unten auf dieser Seite oder springe zurück zum vollständigen Level-Index, um nach Nummer zu suchen.