






Profile Perfect レベル 194 ヒント&答え
「砂漠の蜃気楼の渇き」— ワンクリックで答え、段階的にヒント、ロジック解説、完全攻略の4層構造。必要な層だけをお選びください。
答え
答えだけが必要ですか?以下のパネルを開き、グリッドをゲームにコピーしてください。それ以外の情報は表示されません。
ネタバレ答えのグリッドを表示
| 登場人物 | 登場人物 | 形 | Distortion | 人物 | Reaction |
|---|---|---|---|---|---|
| 蜃気楼A | オアシス | 波状葉 | Linda / Doris | 疲れている | |
| 蜃気楼B | UFO | Split Double | Scott | 驚愕している | |
| 蜃気楼C | Death Reaper | Blurry | Raymond / Ann | 困惑している | |
| 蜃気楼D | バーガー | Stretched | Carl | 驚愕している |
ヒント
ヒントは一つずつ表示されます。ヒント1を開くと、ヒント2が現れます。ファイルの謎が解けたら、そこで止めてください。
ヒント 1 タップして表示
Start with the clues that tie a character's feeling to the mirage they see.
ヒント 2 タップして表示
Use the neighbor clue to decide where Scott and the two couple cards go, then watch which reaction cannot sit next to Oasis.
ヒント 3 タップして表示
When the distance clues remain, count column positions by the difference in their numbers; the last empty Distortion and Reaction slots will only fit one way.
動画攻略
完全な解法をご覧ください:盤面、手がかりカード、配置のすべてを順に — 以下の各ステップは、その瞬間に対応しています。
-
1 Linda Is Parched, Carl Is Famished 0:00 – 0:06
Linda is parched and Carl is famished, so Mirage A's Shape is Oasis and its Person is Linda / Doris; Mirage D's Shape is Burger and its Person is Carl.
Drag the Oasis mirage card to Mirage A's Shape slot, drag the Linda / Doris double-person card to Mirage A's Person slot, drag the Burger mirage card to Mirage D's Shape slot, and drag the Carl person card to Mirage D's Person slot.
-
2 Scott's Three Female Neighbors 0:06 – 0:12
Scott has three female neighbors, so Mirage B's Person is Scott; Mirage A stays Linda / Doris and Mirage C gets Raymond / Ann. The Confused couple is not next to the Oasis mirage, so Mirage C's Reaction is Confused.
Drag the Scott person card to Mirage B's Person slot, drag the Raymond / Ann double-person card to Mirage C's Person slot, and drag the Confused reaction card to Mirage C's Reaction slot.
-
3 The Alien Mirage Two Columns from Carl 0:12 – 0:18
The alien mirage is two columns away from Carl, so Mirage B's Shape is UFO; Mirage C's remaining Shape is Death Reaper.
Drag the UFO alien mirage card to Mirage B's Shape slot, and drag the Death Reaper mirage card to Mirage C's Shape slot.
-
4 Scott Next to Blurry, Stretched Three from Wavy 0:18 – 0:24
Scott is next to the Blurry mirage, so Mirage C's Distortion is Blurry. The Stretched mirage is three columns away from the Wavy one, so Mirage D's Distortion is Stretched and Mirage A's is Wavy.
In Mirage C's Distortion slot, select the Blurry distortion card from the popup; drag the Stretched distortion card to Mirage D's Distortion slot, and drag the Wavy distortion card to Mirage A's Distortion slot.
-
5 Cleanup: Split Double, Tired, and Shocked 0:24 – 0:36
Mirage B's Distortion is Split Double; Mirage A's Reaction is Tired, and Mirage B and D's Reactions are Shocked. All 16 cells are correct and the level clears.
Drag the Split Double distortion card to Mirage B's Distortion slot, drag the Tired reaction card to Mirage A's Reaction slot, and drag the Shocked reaction card to Mirage B and Mirage D's Reaction slots (two cards). Once all slots are filled, the completion screen appears.
重要な場面
クリア時の3つのフレーム:開始盤面、解法途中、完成したグリッド。
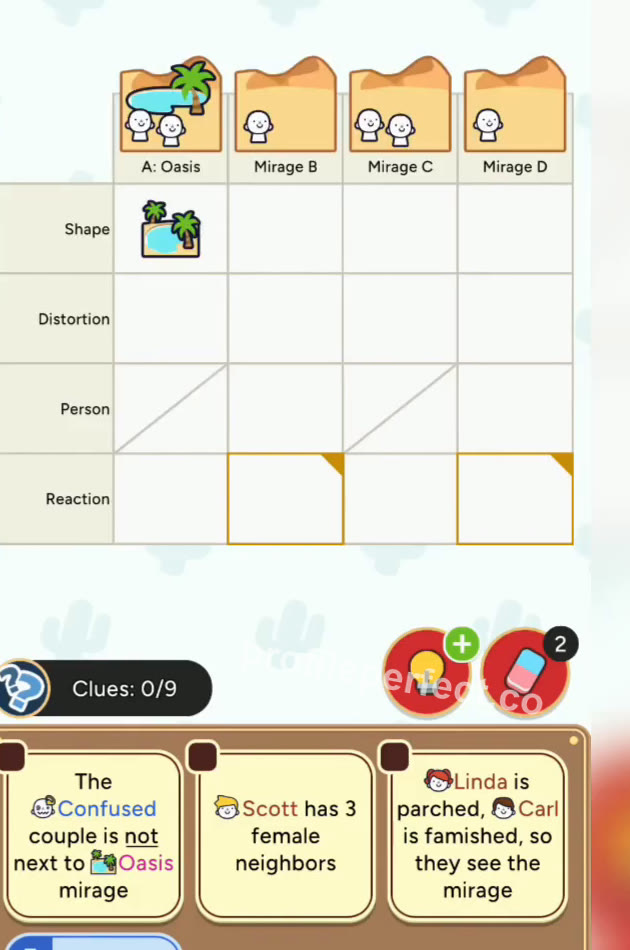
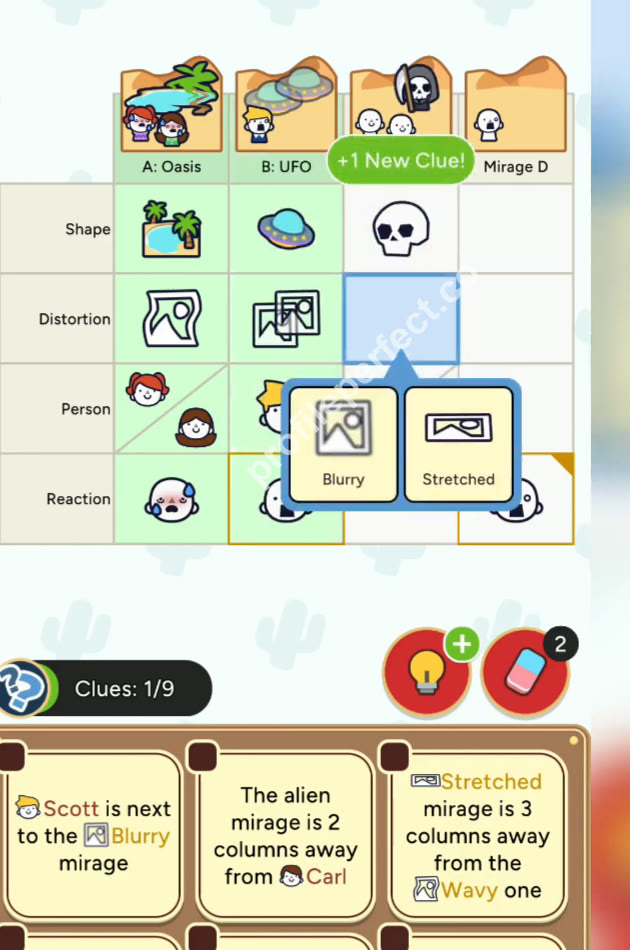
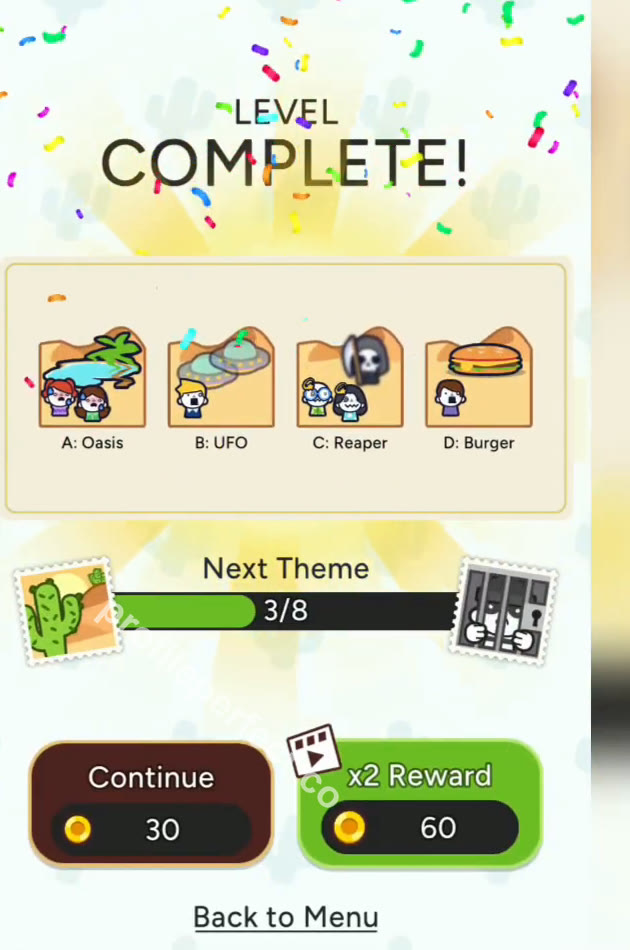
最もトリッキーな手がかり
Treating 'the Confused couple' as just a reaction
The Confused card belongs to Raymond / Ann, not to any empty slot. Since Oasis is at A, the couple cannot be next to it, and Carl already occupies D, so the couple and the Confused reaction must sit at C. If you drop Confused on B because B is empty, you break both the neighbor and couple clues.
Counting column distance by gaps instead of positions
Distance clues use index difference: with Carl at D, the alien is two columns away at B. Similarly, Stretched and Wavy are three columns apart, so Wavy goes at A and Stretched at D. Count the slots themselves, not the number of mirages sitting between them.
最終チェック
This level is a good reminder to follow the emotional clues before touching the Distortion column. Placing Scott by the neighbor clue locks the couples, and the Oasis adjacency rule then gives the Confused reaction a clear home. The distance clues become easy once the shapes and people are anchored. The final reaction cards are pure cleanup.
よくある質問
Profile Perfect レベル194の答えは?
このページにはレベル194「砂漠の蜃気楼の渇き」の完全な答えグリッドがネタバレ防止機能付きで掲載されています。開いてゲームにコピーするか、自分で解きたい場合は段階的なヒントから始めてください。
Profile Perfect レベル194のヒントはいくつありますか?
3つで、強度が段階的に上がります:優しいヒント、キーとなる手がかりの明示、そして決定的なステップ。ヒントは1つずつ解放されるので、パズルが解けた時点で止められます。
Profile Perfect レベル194をブースターなしで解く方法は?
ステップバイステップのセクションに従ってください:まず直接ヒントを確定し、否定ヒントで消去法を適用し、その後位置関係や比較ヒントをつなげます。レベル194はブースターを1つも使わずに完全に解けます。
Profile Perfect レベル194でライフを失ったのはなぜ?
未確定のペアをタップすると試行が消費されます。このページの「紛らわしい手がかり」リストでは、このボードでプレイヤーが誤ってタップしがちなセルを正確にカバーしています。確定する前に再確認してください。
Profile Perfect レベル194はむずかしいですか?
「砂漠の蜃気楼の渇き」ボードはこの区間の想定難易度です。手がかり数は適切で、1~2つの読み間違えやすい表現があります。ヒント順に従えば楽に解けます。
Profile Perfect レベル194の次のレベルは?
レベル195です。このページ下部の「前へ」「次へ」ボタンを使うか、全レベル一覧に戻って番号で探してください。